
Blogs serve multiple purposes for your business. They help you communicate with your customers, engage with your target audiences, and help drive organic traffic to your website. On the back end, posting blogs helps push your SEO strategies by showcasing your expertise, experience, and authority on a subject to search engines that are always looking to provide fresh and relevant content to users.
At My Website Spot, we understand the significance and satisfaction that comes from being able to tailor your messages according to your brand identity and audience preferences. You know your business better than we do and we want your voice to shine through every part of your site. In this how-to guide, we want to equip you with the knowledge and tools you need to thrive when posting or updating blogs on your website. Keep in mind that this guide is specifically for WordPress websites. If you have questions about another website builder, don’t hesitate to reach out to My Website Spot for a free consultation.
How Do You Create A Post With WordPress?
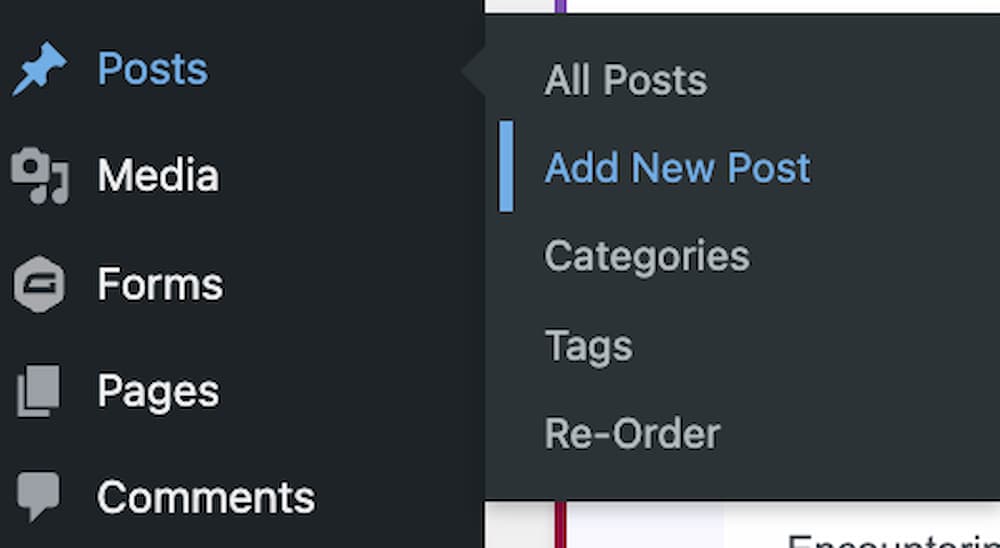
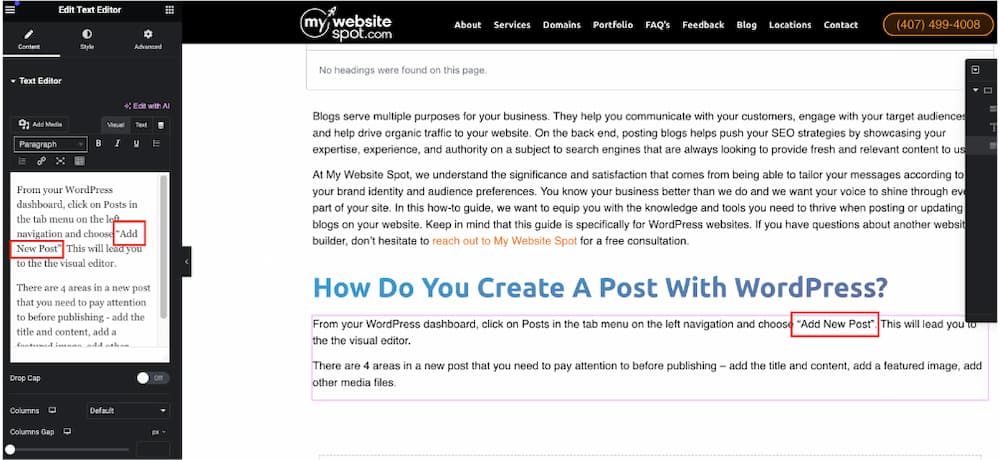
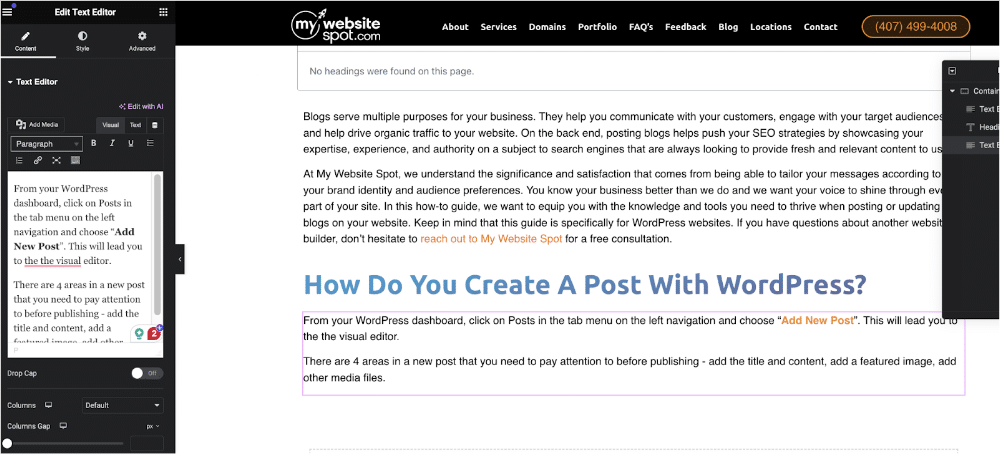
From your WordPress dashboard, click on Posts in the tab menu on the left navigation and choose “Add New Post”. This will lead you to the the visual editor. Be sure to keep multiple tabs open, one for WordPress and one for Elementor. You will be switching between these two as you get ready to take your post live.
There are 4 areas in a new post that you need to pay attention to before publishing – add the title and content, add a featured image, add other media files.
Adding Title and Content Blocks
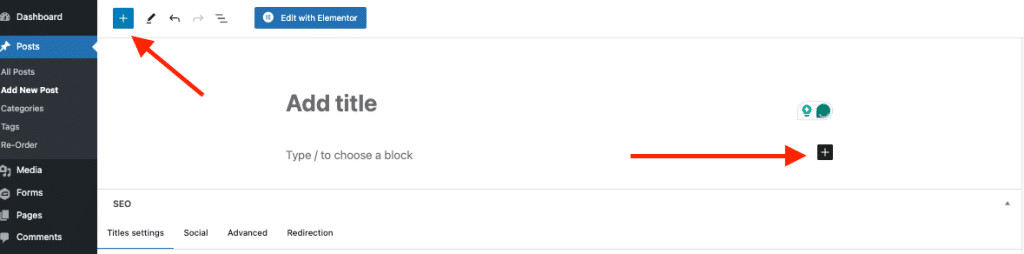
When you open your post’s visual editor, you will see an “Add Title” field at the top of the page with a section below for your content. While it’s possible to publish content without titles, not having a title will negatively impact the ability of users to find and read this content.
You can change the layout of the content block by clicking the ‘’+” icon (toggle block inserter) on the top left of the screen next to the WordPress logo or on the bottom right of the header section. Common content blocks are the Paragraph and Heading blocks. Other options can be found by clicking on the settings icon in the upper right corner and selecting “Block Section” for more editing options.
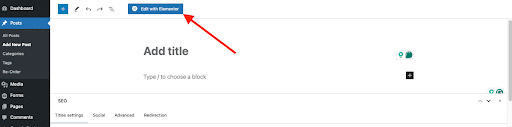
After entering your title, SAVE A DRAFT before clicking the “Edit with Elementor” button on the top of the screen.
Setting up Elementor
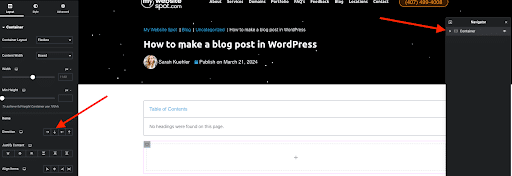
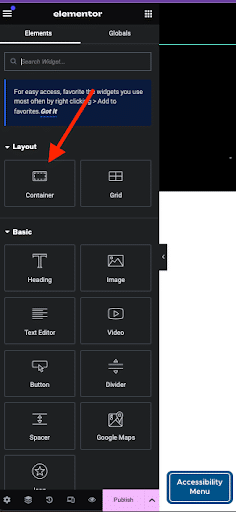
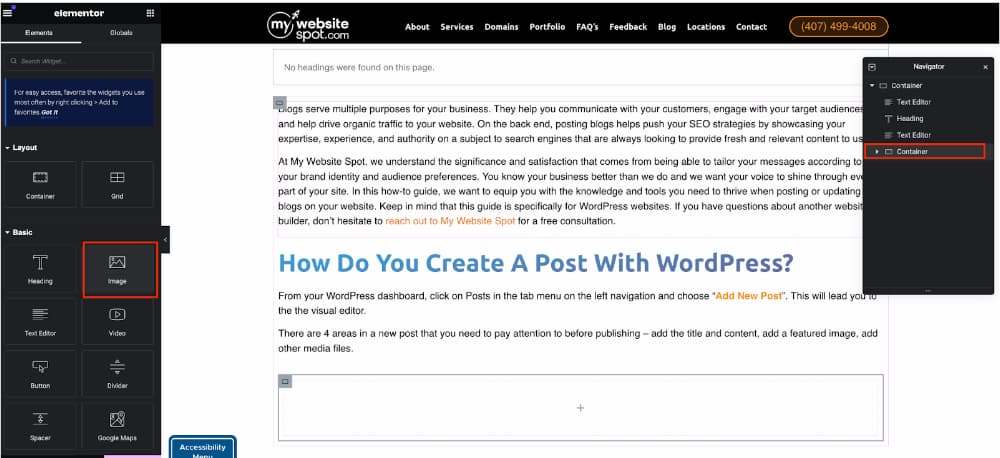
Once you’re in the visual editor, the first thing you have to do is add a container from the list on the left. This will appear in the navigation bat on the right side of the screen and open a new editing menu on the left. The ONLY thing you should click on in the editing menu is the down arrow direction in the ”Layout” section.
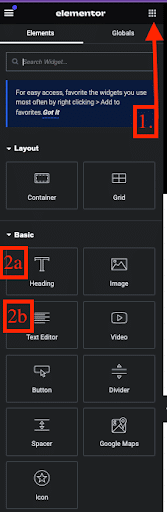
The next step can be repeated depending on how many sections of text you have. Keep in mind that you want to keep all of your content in one container. The container can be broken up into headings and text blocks. To add sections into your post, click the 3×3 dots on the editing menu on the left (see 1 on the below image.)
2a. Heading – these are the headers you use to separate your content. Headers are one of the key data sections that Google looks at when ranking your content.
2b. Text Editor – is where you add your carefully crafted content.
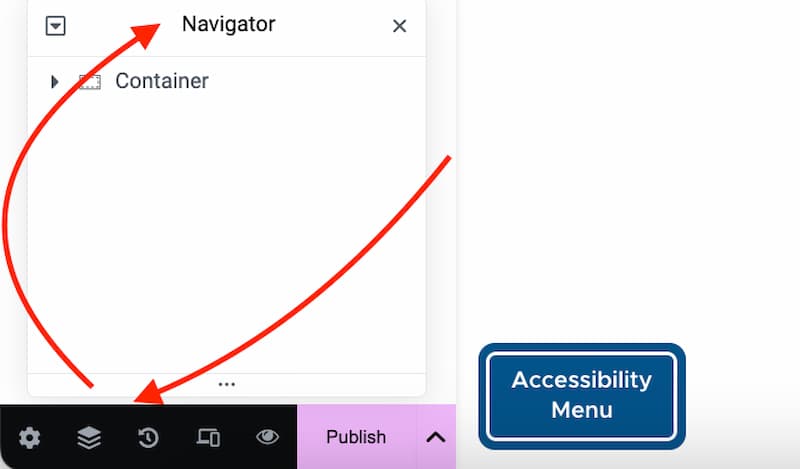
You are outlining how the page will be set up. You can view the order of containers with the navigator window. The written content, images, and other media files will come after you create the outline of the page. It’s important to note that you want to keep the majority of your outline in ONE container – additional containers add lag to your website. The only time you want to add extra containers is when you want to add images to your post (more on this later).
If you add an image container, do not adjust the height of the container – this block already has padding built into it to adjust for whichever device your readers are using to view this page (desktop, tablet, mobile.)
Adding Content
Copy and paste is the fastest way to get your content into the “Heading” and “Text Editor.”
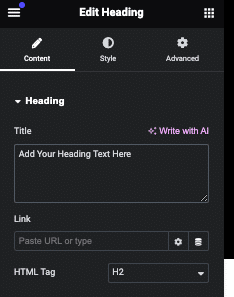
Start by clicking on Heading in the navigator window on the right. You will see the editing window on the left where you can type or copy and paste your first header into the “Title” section.
You will see the HTML tag at the bottom. Think of headers as sections (H2s) and their subsections (H3s). Only use H3 tags if you have more than one subsection under an H2 – otherwise, create additional sections as H2s. The only H1 HTML tag will be the title of your article.
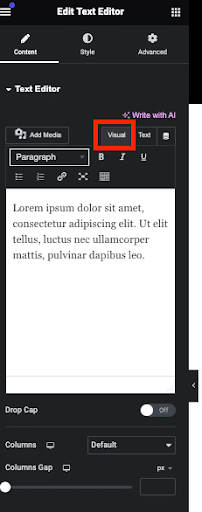
As for the content itself, click the “Text Editor” from the navigator window. You will see options for “Visual” and “Text” in the editor window on the right. If you’re copy and pasting content from Microsoft Word or Google Docs, you will want to paste without formatting each of your content sections into the “Text” tab.
When copying and pasting content from a desktop app or webpage, it’s common to also paste unwanted formatting. This formatting may not align with your WordPress theme’s fonts and colors and can disrupt the overall appearance of your post.
If you have images saved in your Word or Docs document, you want to upload these images into the media library before inserting them into WordPress or Elementor. Images pasted directly from these writing sources will break up the text in the “Text” tab.
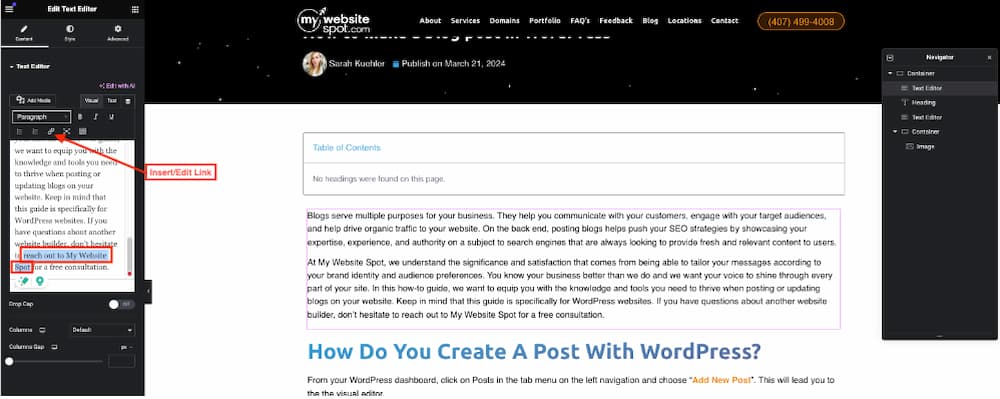
Styling - Bolds, Italics, Underlines, Links, Lists, and Text Alignment
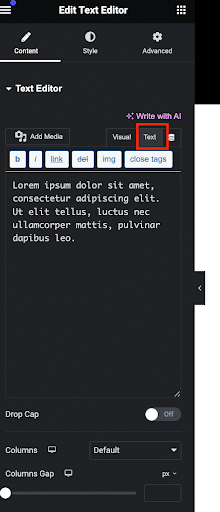
To manually fix styling errors, the HTML code of a post can be seen by clicking on the “Text” tab at the top of the box containing the content of the post. If you’ve copied your post from Google Docs, you will need to manually correct the formatting in the HTML code.
- Remove all the <span style=”font-weight: ###;”> and </span> tags.
- Changing all the <li style=”font-weight: ###;”> to just <li>.
- For bold text: Changing <b> and </b> to <strong> and </strong>.
- For italic text: Changing <i> and </i> to <em> and </em>.
There’s an easier way to do this.
If you paste your content without formatting into the “Text” tab, you can click on the “Visual” tab and add your styling. In the example below, we want to bold the text outlined in red. We will highlight the specific text and click the Bold icon.
How To Add A Featured Image
Featured images (or thumbnails) are the pictures that show up on search engines or social media when your post is shared. To add a featured image, open the post-editing screen for your WordPress post.
Navigate to Settings → Post → Featured image. Click the “Set featured image” link (This action will take you to the Media Library, where you can select an image.) After selecting the image, you can edit it using tools on the right side of the Media Library (like altering alt text, caption, and image description.)
To change the featured image later, click the “Replace Image” button under the Settings section.

Add Images
When adding a container for an image this new container will be within the original container. Do not add any padding to this container – it is already built in. Select the new container from the navigator window then click and drag the “Image” block from the elements window into the container space.
There are three ways to upload images in WordPress block editor – Drag and Drop, add from existing media library, and upload a new image (Dashboard → Media → Add New). Images can be arranged as a single picture or as multiple images in a grid layout with the Gallery block.
To edit an image, click on the image then and go to “Settings” and choose “Block”. This is where you can adjust the image’s style, size, and dimensions.
Add Other Media Files
Media files (video, audio, downloadable documents, etc.) can be uploaded to the media library for use in posts. Go to “Media” from the WordPress Dashboard and click “Add New” to upload the media file.
Just like adding an image, you need to create a new container and associated block within this container for the media file.

How do you add links to your content?
Similar to styling your text, to add a link you need to be in the Text Editor. In the Visual tab, highlight the text you want to use as the anchor text and click the ‘Insert/Edit Link” button.
If you are internally linking, click the blue arrow to accept the link. If you are linking to an external website, click the settings button, check that your external link is correct, check the “Open link in a new tab” box, and click update.

How do you write a good headline?
We’ve covered how to add header sections into your Elementor post earlier in this article. But making an engaging headline users can’t resist is tricky.
Good headlines are subjective to the reader and what they’re looking for. While you want to cast a wide enough net to attract the most users, you want to be specific with the purpose of the content to let readers know what the content is about from the headline.
Be simple and be direct. You want to focus on one of these three aspects with your headline:
- Indicate that you will help the reader solve a problem they are struggling with.
- Make your audience curious about something.
- Provide valuable knowledge or insights.
A good place to look for headlines and headers is to pull from your FAQs or using Google’s “People Also Ask” queries. You already know that these are the questions users are asking, so capitalize on them!
How do you publish the post?
Publishing a post is as easy as clicking the “Publish” button at the bottom of the Editing window on the left.
How do you schedule a post?
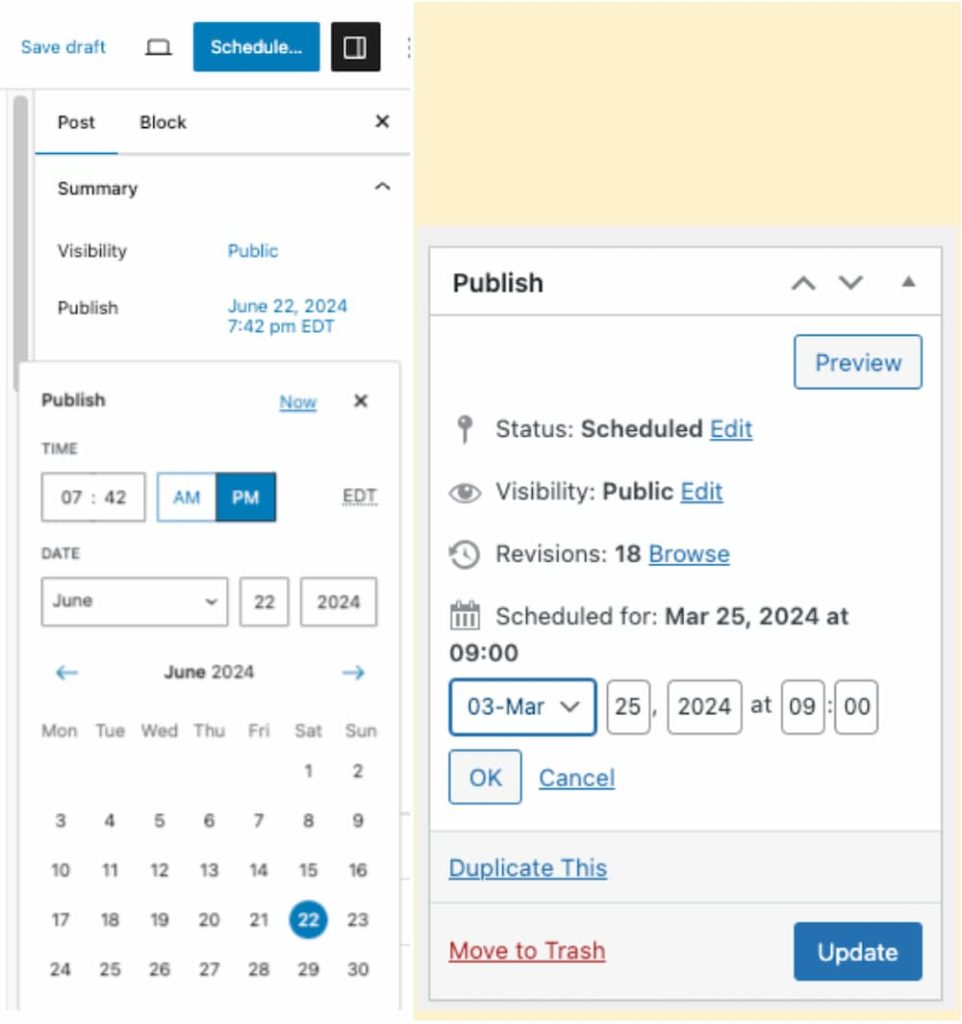
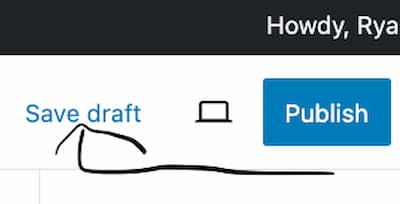
If you don’t want to publish immediately, you can schedule a specific date and time for the post to go live. Save your draft in elementor by clicking the arrow next the publish button and selecting “save draft.”
Go back to the WordPress Dashboard where you have this post open. In the left window, check the Visibility and Publish (date) of the post.
Click the date and then the link next to “Publish” to display a calendar with an option to set the minute, hour, day, month, and year. You can do this for future and past dates (if you want a post to appear as if it was published immediately on a different date).
You can still return to a post to continue editing it after it’s published. From your Dashboard, click on “Posts” on the left side. You can select the post from these categories and go to your choice’s editing screen.
- Published – Posts you have published to your blog.
- Drafts – Posts you have started but have not yet published.
- Scheduled – Posts you have set to be published at a future date.
- Trashed – Posts that will be deleted after 30 days.
How do you save it as a draft?
ALWAYS save a draft in elementor! Do this repeatedly as your create your post to mitigate unforeseen issues that might arise (power outage, dropped internet, etc.). You can save a draft in Elementor by clicking the arrow next the publish button and selecting “save draft.”
Drafts can be also found in WordPress from the Dashboard under Posts → All Posts → Drafts.
If you want to change a post back to a draft, go to the editor and click the “Switch Back to Draft” link in the top right corner of the screen.
How do you revise a post?
If you have a post that you want to update or revise, log in to WordPress and choose the post from the navigation on the left side.
Once you have the page open you’ll see a selection of buttons on the top. Open the “Edit Post” into a separate window.
Once you have the page open you’ll see a selection of buttons on the top. Open the “Edit Post” into a separate window. Also open the “Edit with elementor” into a new tab.
How do you delete a post?
There are two ways to delete a post in WordPress. First is to move the post to “Trash” from the editor (located in the settings tab). The other is to go to Dashboard → Posts → All Posts, hover over a specific post, and click Trash.
If you change your mind and want to reinstate a post, you have 30 days to access it from the trash folder and click Restore.

Lighten Your Load With An SEO Expert
Publishing blogs enhances your online presence and opens the door for opportunities to connect with your audience. Remember, you’re not just creating blogs. You’re crafting compelling narratives that drive engagement and foster lasting connections with your customers.
Whether you’re tech savvy, a website novice, or need to offset blogging responsibilities, My Website Spot is here to support you. We have been supporting business websites for nearly two decades and understand how to tailor your articles to fit your brand, boost your organic traffic, and establish your authority in your industry. Contact My Website Spot for a free consultation as you continue to expand your business through blogging.